Aashish Singh Negi ...... The Pro

My photo
Mumbai/Rudraprayag, Maharashtra/Uttarakhand, India
Hello Friends, This is Aashish Singh Negi from Mumbai. I natively belong to Uttarakhand. I completed my engineering in Information Technology from Sinhgad Institute,Lonavla Of Pune University. I love Programming......... I know some programming languages like C,C++,Visual Basic,C#,SQL,etc. and work upon various technologies like ASP .NET,Silverlight 3.0,Silverlight 4 Beta, Microsoft Pivot, Photosynth,Deep Zoom, Azure Cloud Computing, etc. I love techno topic very much.Love to watch videos of new technologies(softwares,hardwares,etc) launched by different companies............
Showing posts with label negi. Show all posts

Monday, July 5, 2010

My HandsOn with Microsoft Pivot ( + Silverlight Viewer )

First of all i would like to thank Twitter because a tweet on twitter about World Cup Pivot inspired and sparked me try my hands on this awesome tool/application from Microsoft - Pivot.

i would like to remind you all of the great saying "a picture speaks a 1000 words .....". My Pivot collection also contains a number of pictures so rather than discussing about what Pivot is all about, i would like you all to visit the Sample Pivot Collection which i created and uploaded to my web server.

My Hands-On ...

You need to have "Pivot Viewer" installed on your computer to view this. The Pivot Viewer is available at http://www.getpivot.com/download/. There is a Silverlight PivotViewer also that is available for download at http://www.silverlight.net/learn/pivotviewer/. To view the Pivot Collection online you just need to have Silverlight Plug-In installed on your machine.

If you have downloaded the normal Pivot Viewer then you can open the "Microsoft Live Labs Pivot" application installed on your machine. After opening the above application you can put the following url to view my Pivot Collection http://pivotapp.aashishnegi.com/Sample.cxml.

If you have Silverlight installed on your machine, you can visit the Silverlight Version of my Pivot Collection at http://slpivot.aashishnegi.com/Default.html.

Now viewing the above links you must have understood that you can view the Pivot Collection by two ways.
  1. Using the Pivot Viewer installed on your machine and getting the url of the .cxml file.
  2. Using the Silverlight Pivot Viewer. I think this is a more better way as it allows me to view the Collection directly through the Browser making use of Silverlight's capabilities.
How was your experience with the Pivot ???

How you can create this ?

Now i will focus some light onto "Pivot" and then explain the simplest steps to create your own Pivot Collection and host it online as i did it.

You can get the details about Pivot at its Official Site.

now rather than discussing the details and introduction of Pivot, i will take you through the simplest steps you can follow to build up your own Pivot Collection. There are many ways to create the Pivot Collections.
  1. Command-Line ( http://www.getpivot.com/developer-info/cmd-line-tools.aspx )
  2. Excel Plug-In ( http://www.getpivot.com/developer-info/excel-tools.aspx )
  3. Just-In Time Pivot Collections ( http://www.getpivot.com/developer-info/jit-tools.aspx )
Here i will discuss the method of developing your Pivot Collection using the "Pivot Collection Tool for Microsoft Excel". You can download the Excel Plug-In from the following link http://www.getpivot.com/developer-info/download-excel-tools.aspx. You need to be online while installing the tool. Run the setup in the Downloaded Package.

After you have installed with the Excel Tool, you can see one more additional tab in your Microsoft Excel's Ribbon Bar. There is "Pivot Collections" tab that gets added. you can see the following picture which shows the tab.


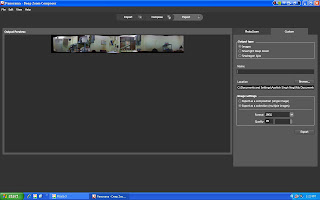
You can see i have specified the Pivot Collections tab in the above image. Click on "New Collection" button on the upper left corner. U will get a new excel book window.

Click on "Import Images" button to select multiple images which you want to upload to the Pivot Collection. The images get added to your Collection. Now what just modify the cell values "Name", "Href", "Description" and you can even insert some new "Facets" - the columns which get displayed inside the "Facet Catagories" on lower left side of the "Pivot Viewer". I added "Place", "Pic Taken By" and "Date" as you can see in following image.


Now you can see the "Quick Preview" of your Pivot by clicking the "Quick Preview" button in the ribbon bar. You wouldn't get to see the images in the "Quick Preview" but you will get see all other characteristics such as Facet Catagories, Facets, Sort DropDown, Filter Panel, Info Panel, etc as shown in following image.


If you are ok with the preview, you are ready to hit "Publish Collection". The excel tool publishes the collection and you get following screen.


After its done with the publishing, you will see your collection opened in the "Pivot Viewer" ....


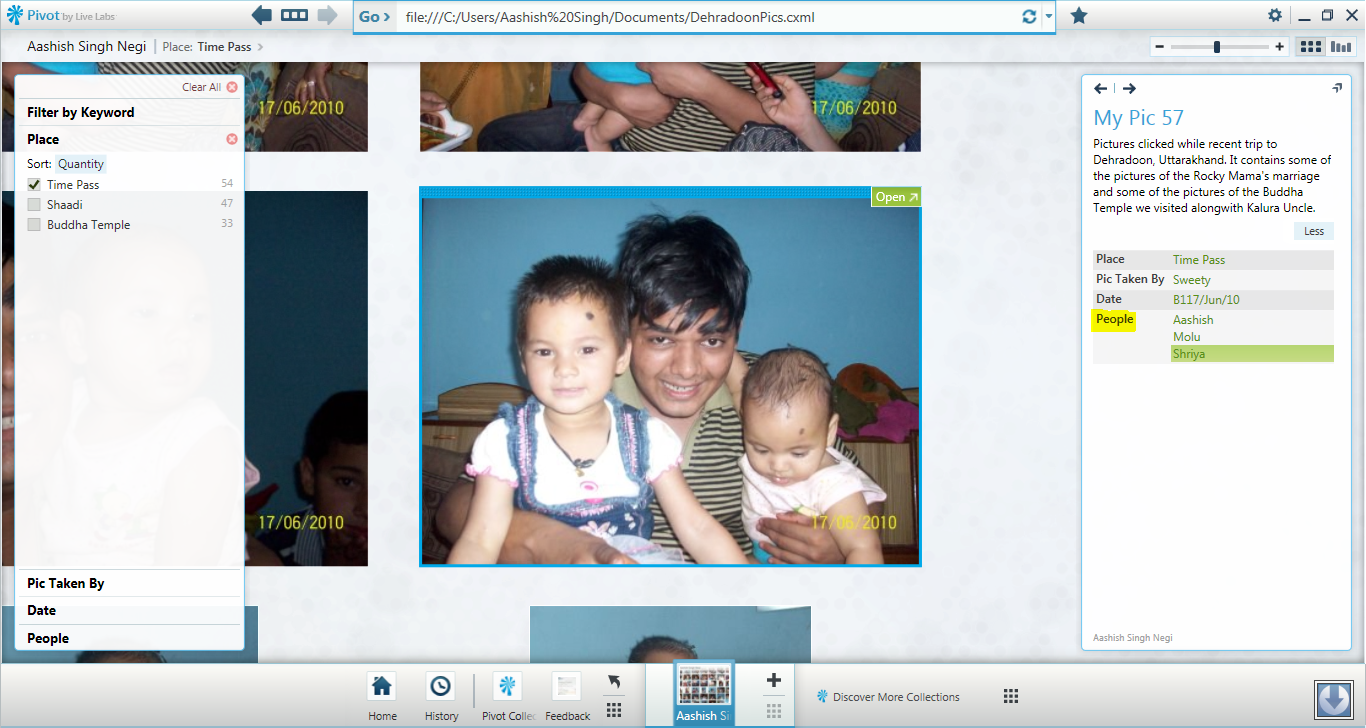
I did some more changes in the collection. What if i want to add multiple values to a single column. You can do it easily. Just separate the values with "double pipe" i.e. " || ". You can see in following image i created the column named "People" containing the multiple values.


I published it and you can see in following image the "Multiple Values" shown in the "Information Window".


What happens after we Publish the collection ?

After you publish the collection and select the location many of the files get created.

  1. The .cxml file which is an important file which we point and open up in the Pivot Viewer.
  2. A folder with the collection of images and some XML files to handle the images.
If you open the images folder, you will get to see the same architecture and structure as shown by the "Microsoft DeepZoom files" as it works the same way using the "Tile collection" of the images.


The Endnote.

So friends this was my cool experience with "Microsoft Pivot". The "Pivot Collection" i have mentioned in the above example and in the images contained images of size approx "1.5 MB" each. The folder of Images which i added to the collection is about "985 MB". This size of the Images in collection was shrinked to "221 MB". But that was also big n vast in size, so i didn't uploaded this collection to my Web Server.

I created another Pivot Collection to my Web Server which you have viewed through the above links.

I would soon blog about how integrating your Pivot Collection to the Silverlight Application and deploying it to your Local IIS or the WebServer.

Thank You for visiting the Blog.

Please leave your comments to help me improve my blog.

Aashish Singh Negi
aashish.negi@sitgeeks.com

Saturday, January 9, 2010

Silverlight 4 Beta - Playing with WebCam, Printing Support

First of all i should thank a bunch of people who helped me in creating this application.

You can view the Silverlight 4 application i created at http://testing.aashishnegi.com/Default.html. You should have a WebCam on your machine and the machine should be installed with Silverlight 4 Developer Runtime. It will not work in silverlight3 plug-in nor the plug-in will get updated through the popup it displays. You should manually download and install the SL4 Runtime from Silverlight.net.
Now i will briefly discuss about the project and how you can have a little modifications and try out various new things.
Lets start with a preview of how the screen looks and the controls i placed on the screen.


  • WebCam & Mic Support: Lets start and see how we can add the webcam support to the application.
CaptureSource provides us with the methods that work with specific audio or video capture from the associated capture device.


After the CaptureSource is initialized, VideoCaptureDevice can be used to to get the default device configuration. CaptureDeviceConfiguration.GetDefaultVideoCaptureDevice() provides it with the default configures video device. If you right click on Silverlight App and select the Silverlight Plug-in then under the WebCam/Mic tab, we can select and set the default device.

After this the CaptureSource we created above can be used to control the camera. The CaptureSource.Start() and CaptureSource.Stop() will start and stop the cam. As the use of Cam requires user intervention the methods CaptureDeviceConfiguration.AllowedDeviceAccess  and the function CaptureDeviceConfiguration.RequestDeviceAccess() provides user with following dialog box for access request.


In above code the “viewer” is a rectangle that is filled with the brush “VideoBrush” to display the captured input of device.


Clicking Of Pic is something i felt a bit difficult and i referred Vikram’s Blog for understanding this. Following is the code bit for it.


AsyncCaptureImage() can be used to click a snap from the CaptureSource. The Image img is used to add the image to the list box after it is clicked.
  • Saving the image as PNG: This section will tell how to save the image we clicked. For this you can refer the following bit of code. .NET Image Tools Library is used in following code lines. .NET Image Tools made it very easy.


  • Printing Support: Lets see how we can print something using Silverlight 4 printing support.


Here we can see that PrintDocument class provides printing capabilities for a Silverlight application. As in above code we can see i initialized the PrintDocument and initiated a EventHandler which checks for when the PrintingPage event occurs. Print() can be used to show a Print dialog box.

The PageVisual property is used to choose what elements or rather UIElements we need to print.The PrintableArea defines the area to be printed. HasMorePages represents whether there are more pages to print. Its a bool that returns true if there are more pages to print.

StartPrint can be used if we need to perform some special handling or set up before beginning the printing. The EndPrint event can be used to perform cleanup operations after printing is complete or to detect errors that occured during the printing process. EndPrintEventArgs.Error property will give out the error occured.
  • I am currently working with the other new features of Silverlight 4 Beta like Out-of-browser Network Support, Drag and Drop + ClipBoard support, WCF RIA, RightClick support, etc. I will soon blog about these too.

  • Thank You all for visiting my blog.

- Aashish Singh Negi
Twitter @aashishnegi
Phone: +919970141082

Sunday, November 8, 2009

Use Windows Azure SDK to deploy your Azure Project to Development Fabric ...

.
Today we will learn how to deploy our Azure Project to our local Azure Development Fabric using Windows Azure SDK. This method helps deploying the application onto the computer which doesn't have Visual Studio installed in it.
Lets start off with it. You need to have Windows Azure SDK installed onto your computer to start working with following.

1. Start the instance of Development Fabric and the Development Storage as shown in following figure .......

2. Start the Windows Azure SDK (with elevated admin privilege; right click and select Run as Admin). Navigate to the directory ..\Windows Azure SDk\v1.0\bin\


find two file cspack.exe and csrun.exe in this folder. these are the files needed to pack and deploy the project.
3. At the Azure SDK Prompt, type cspack/? This would provide the information about the cspack command. it provides few examples at the end.

As we can see in the help, we need to provide the Service Definition file (.csdef) as a parameter to the cspack command.

There are some other options also we can pass along with cspack command.
a. If we want to deploy our project locally, then we should provide the /copyOnly option. This option provides us with a folder named .csx containing the roles and the csdef file.

b. If we execute without "copyOnly" parameter, we get the Package File (.cspkg) file. this Package file and the Configuration file (.cscfg) can be uploaded to Azure Portal and the project can be deployed online.

c. if we are using the Worker Roles in the project, we should specify the workerroles as well as the workerrole-entrypoint-dll for the Worker Role.

Now after we run the cspack command (in this case with /copyOnly option) , we get following output ...


*** In this example I am using the HelloWorld azure project that is included in the Azure SDK Samples ...


Now after we have packed our application, its time to deploy it or run it to see it working.

For deploying the project we would use teh csrun.exe.

To get overview of csrun command type csrun/? in the SDK.

Get to the folder that contains the *.csx folder and then execute the following command as shown in figure ....
csrun /run:ServiceDefinition.csx;ServiceConfiguration.cscfg /launchBrowser

thus we need to provide the *.csx folder and the Configuration file.

/launchBrowser options starts the Browser with your Web Role running ....


You can open up the Azure Development Fabric to view the Deployment Information .....


Please post comments ........

Aashish Singh Negi

Twitter @aashishnegi

Friday, October 9, 2009

Introduction to Expression Studio 3 ...............

.

All of you must have heard or read about the new Software Suite from Microsoft .... "Expression Studio 3" ...................

today i will introduce you all to the new Expression Studio and tell you the tools it provides .............

You can follow the above links to download the whole suite ...... students can get the full version Expression Studio using their DreamSpark accounts ..................

After you install the Expression Studio Pack ... you can get following tools or application in your start menu under Microsoft Expression.


As you can see the list of following applications in the Microsoft Expression Folder ............


  • Expression Blend 3
  • Expression Web 3
  • Expression Design 3
  • Expression Encoder 3
  • Expression Encoder 3 Screen Capture
  • Expression Web 3 SuperPreview
  • Deep Zoom Composer.

Out of above aplications, DeepZoom Composer needs to be downloaded from Download Centre.

I am placing the screenshots of all these applications ... and brief overview of all of these.


I will soon provide an overview of each and every product ......

Saturday, September 19, 2009

Silverlight Tutorials .... A new initiative to spread the LIGHT !!!

.

Hey guys i am now uploading some of the tutorials - the pdf onto my SkyDrive so that everyone would be able to download it from the web and learn Silverlight and other technologies .....


.


Topics covered till now :


  • Creating a SketchFlow Application
  • Element to Element Binding in SL3 Application
  • Database Connectivity using RIA
  • Silverlight Business Application
  • Silverlight Navigation Application
  • DeepZoom and Silverlight
  • Making Your Application run Out-of-Browser

.

I will be covering some more topics in my future blogs and tutorials like

  • Using DataForms in Silverlight Applications
  • Using Actions and Behaviours
  • More About SketchFlow Projects
  • Integrating Your Silverlight page with Windows AZURE
  • and some other features of Silverligt.

.

How can u get the tutorials ?

Its very simple ..... just visit My Live Space. There is a folder by name "Silverlight Tutorials".

Open the folder and download the required PDF.

I have also uploaded the Projects which i show in the Tutorials. you can download them also.

Waiting for suggestions and replies from all of you ....

- Aashish Singh Negi

aashish.negi@sitgeeks.com

Twitter @aashishnegi

.

Visit my Cloud Application at http://aashishsingh.cloudapp.net/ . I will soon blog about how to create a Windows Azure Cloud Application and how to deploy it to the Cloud.

Saturday, August 29, 2009

A package of NEW TECHNOGIES ........

.

I haven't blogged from a long time ........

Now after attending the PUG DevCon on 8-9 th August, I cant wait about writing what i learnt there.

A whole set of new technologies .....

DevCon (Developer Conference) was organised by PUG (Pune User Group) sponsered by Infragistics and INETA. It was an awesome event.

There were variuos sessions on various technologies by Professionals.

Let me open the PACKAGE for U all and tell U what I learnt ......


  • AZURE CLOUD COMPUTING
  • SILVERLIGHT 3
  • RIA Business Application
  • ASP .NET MVC
  • JQuery

AZURE CLOUD CPMPUTING :

This is a nice technology from Microsoft to support the concept of cloud computing, The sessions were taken by Abhishek Kant (MVP Lead), Vikram RajKondawar and Monish Darda.

All of them cleared the concept about AZURE. All the doubts inmind about AZURE and CLOUD COMPUTING were cleared.

there is a lot of theorotical concept involved but seeing it practically or working on it LIVE is very nice experience.

U all can also visit Azure's WebSite and register for an account so that U can access the features of AZURE PORTAL.

I have also created a HELLO WORLD AZURE APPLICATION. U can visit it at http://aashishsinghnegi.cloudapp.net/


SILVERLIGHT 3 + SKETCHFLOW + RIA :

This is another latest technology from Microsoft. It all started with Silverlight 1.0 (XAML), then Silverlight 2.0 (XAML + C#) and now SILVERLIGHT 3.

Silverlight 3 can be said as a package of new features over the old Silverlight. You can download the latest Silverlight 3 Tools and Expression Studio 3 to make use of new features.

Expression Blend 3 + Sketchflow (Included In Expression Studio 3) comes with a new feature of SketchFlow.

Using Sketflow U can create a rough sketch of your application. U can manage the flow between the XAML pages. The rough SKETCH can be presented to the user and the suggestions of user can be saved and reviewed by the Developer.

Using RIA Services in the Silverlight 3 Application, we can create a business application very fast. It takes only 15minutes to create a database business application with built-in user management support.

Use of Domain Service makes it easy and fast to create a database rich application.

Vic Parmar (from Infragistics) showcased all new set of Silverlight UI tools. It was awesome.

ASP .NET MVC :

We all have been creating ASP .NET Web Applications and Web Sites. But now here we get a new feature MVC ( Model View Control ). Rahul Rajadhyaksha was the great mind to tell us about this. That was a little HiFi session for me but afterwards when i worked on it and created some Projects on it, it was very easy to understand.

I will blog about ASP .NET MVC sometime later when i get better hold of it.

JQuery :

This was also a HiFi session by Dhaval Faria. You can refer JQuery site to know more about it. I cannot blog about it right now as i haven't gone through it till now. What i think is that it will be nice using JQuery in our application to make it faster.


Thats al for now guys. I will be back blogging more on SILVERLIGHT 3.

Vikram Rajkondawar had one nice SILDE with him ...... WORDS OF WISDOM ...


" TECHNOLOGY has the POWER to ALTER REALITY !!! "

Saturday, April 18, 2009

DeepZoomPix - A New & Interactive Way to SHARE & EXPLORE Photos ...

.


Hello Friends ..... All of u have must seen the old DeepZoom Online Composer - "PhotoZoom".

Now the old service of Photozoom has been replaced by a newer one - "DeepZoomPix"

  • Go and visit DeepZoomPix WebSite to experience the new technology ....
  • You will get a Welcome Screen on this site ... Click On "Get Started"
  • SignIn with your Windows LiveID. If you have used the PhotoZoom service just signin with the same ID to get the previous albums you have uploaded.
  • Now you get a screen where you can see all your previous albums, add photos, etc
  • Click on any of the album or Click on "Add Photos" to add new photos.
  • After adding the photos just click on the Album you want to start with .
  • You will get a new screen "Deep Zoom View" . Just hover your mouse over the area where the Photos are shown and you will get a new window to customize the view of your photos.
  • You get an option of putting Tags to photos, Change the Layout, etc.
  • Click on "Share" to get a code you can add to your blog or your web page to embedd a DeepZoomPix control onto your site, blog, etc.

What are the key user experience features of DeepZoomPix?

Seamless navigation:
DZP enables the seamless exploration of albums of photographs. Users can navigate the photographs using mouse or keyboard and zoom into them to see them at their highest resolution. Users never wait to reload a page – the entire experience is fluid.

Layout options:
Arrange images in different ways including by in a calendar style view by date.

Dynamic filtering:
Tagged images can be filtered interactively with live updates to the displayed set of images and you can add your own tags to images.

Interactive slideshow:
Users can zoom into and pan around images while they are playing a slideshow. Slide timings are customizable and navigation can be controlled using the keyboard.

Import photos from the web:
DZP can access images stored in other services on the web. If you are a Facebook user, the DeepZoomPix Facebook application enables you import your public Facebook galleries into DZP. If you are a Flickr user, DZP can use the Flickr API to import your Flickr photos. Finally, if your photo service provides RSS feeds containing JPEGs, DZP can use those too.

Shareable mini-viewer:
Embed your slideshow in your blog or website, or send to a friend using the DZP mini-viewer.


What are the key architecture components of DeepZoomPix?

There are four main architectural components:

Image Ingestion:
Import images from the user’s local file system, Facebook, Flickr API or RSS feed. This takes place on the server.

Tile Processing:
Imported images are sliced into tiles for use by the Silverlight Deep Zoom technology.

Image Storage and Retrieval:
Tiles are stored as blobs using the Windows Azure Services Platform, specifically Windows Azure Storage.

Client Viewer:
Silverlight application for managing and viewing images.


Which technologies does DeepZoomPix use?

DeepZoomPix is a technology demonstration designed to show three technologies: use of Microsoft Silverlight to create a rich interactive UX for exploring images, the Silverlight Deep Zoom technology and Windows Azure Services Platform.


Goto DeepZoomPix FAQ to checkout more queries on DeepZoomPix.


*** DeepZoomPix is a technology demonstration that will be available until December 31st, 2009.


Get started by importing your own photos and prepare to be amazed!

Saturday, January 3, 2009

Using Silverlight Live Streaming ...........

Hey Friends .... First Of All Happy New Year to All Of You ......

Pray To God That We all have a Hapy,Prosperous And Techno Full Semesters This Year ....

Pray to our Techno Gods That We Meet Up With More New Exciting And Thrilling Technologies ....

Friends In last session i told u all "How To Create Panorama using The DeepZoom Composer" .......

-> Now this session we would be talking of how to Upload our Silverlight Applications (Whether Application of VS2008,Expression Encoder,Blend,DeepZoom Composer etc.) or Videos to our Web Pages or to Our Blog Pages Using Silverlight Live Streaming ..........

-> We would also talk about the Web Version of DeepZoom Composer i.e. Photozoom that helps us to create our Silverlight Enabled Deep Zoom Album online ..... Just Upload The Photos And Get The Online Album ....


1) Uploading Using Silverlight Live Streaming .........

- First of all goto Silverlight Live Streaming Web Page .......... And SignIn Using Your Windows Live ID ....

- Now After Signing In Just Complete The Other Processes Needed To Complete Registration And Click On "Manage Application" Link That Appears On Left Side Of Page ....


- Now After Clicking Manage Application You Will Get The List Of Applications Already Uploaded To The Silverliht Live Streaming as Shown In figure below .....


Click on any of the Application Title uploaded Before To Edit Their Properties .....

Click "Upload An Application" to Upload A new Application To Silverlight.Live.Com

Give The Name For The Application as Shown in figure below ...And Click Create .....


*** Now Follow The Following Instructions Carefully ***

* As u all know the life of the silverlight application we create is present in the XAP File created while creating silverlight appliation.

* To View The original contents of this XAP file just rename the file to "JAR File" Or "ZIP File". For Eg. Just Rename 'Pro.xap' to 'Pro.xap.zip'. Now If U extract this ZIP file, u will get following two files - 'DLL File' And 'XAML File'.

* In case of Silverlight Applications Using Video Files eg. Application created using Microsoft Expression Encoder,etc. u may find the 'Video File' along with the DLL & XAML Files.

-> Now U need to create a file "Manifest.xml" whose contents will be as follows :

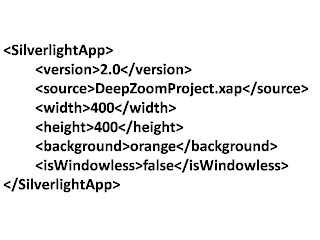
DeepZoomProject.xap is the XAP file of Application ....

-> Now Zip the existing XAP file along with this Manifest.XML file. ** In case U are uploading the DeepZoom Application ZIP the "GeneratedImages" folder along with the XAP File And XML File

-> Now Select This Compressed File In The File Select Dialog Box U get After Clicking The "Browse" Button


-> Click "Upload" And Your File Will Get Uploaded To The Server. After The Upload Is Complete U Will Get A Screen As Shown Below ... telling Various Informations And Properties Of Ur Application.


-> Here U will get various options such as Launch Application test Page - To view Ur Uploaded Application Delete Appliation options For Embedding This Application Into Ur Web Pages Or Blogs

-> To Embed the application onto ur web page/blog follow any of the method and U will get a nice Silverlight Application Added To Ur page ..........


2) Creating An Online Album Using Photozoom .... Its Very Simple ... A person having 0 knowledge of programming/deepzoom/silverlight,etc can us the Photozoom to create his online Photozoom Album ......

-> Just head to Photozoom Site ..... SignIn with Ur LiveID .......Click "Get Started" ......

-> Just A Give The Name For The Album ........ And Select the Photos To Be Uploaded ....

* Silverlight RunTime Needs To be Installed as needed By Upload Application

-> After Uploading The Photos ... U get Various options of Viewing the Album, Email the Album, Delete The Album etc.


-> Select View Album To View Ur Photozoom Album .......... U will get an iframe code to embed this photozoom viewer into ur web pages/blogs ...


Thus Friends here We saw beautiful and easy methods for uploading our silverlight applications and creating Online PhotoZoom Album and embedding them to web page/blogs .............


U can see on this page .... I have Uploaded two Silverlight Frames ........


-> My Panorama - As Told in Previous Blogs, I created A Panorama Using DeepZoom Application and Uploaded It Using Silverlight Live Streaming .....


-> My Photozoom Album - I have created an Online PhotoZoom Application And Embedded It To My Blog page


*** Friends pls Share Ur Views About My Posts,Blog Page,My Presentation,etc to help me knowing the mistakes i would be making and let me correct them and make my future posts error free ***


-Aashish Singh Negi
SIT Lonavla
Email: negiaashish2008@hotmail.com
Blog: http://aashishthepro.blogspot.com/
Site: http://sites.google.com/site/aashishthepro


Monday, December 22, 2008

Creating Panorama Using Deep Zoom Composer .....

Guys You All Would Be Using the Deep Zoom Composer For Creating Silverlight Enabled Deep Zoom Applications. Deep Zoom is very nice technology evolved through the Seadragon Technology.Now The Online Version Of Deep Zoom is also available called as Photo Zoom ( also called as Seadragon Ajax Technology ).


See More Details At http://www.livelabs.com/ - Microsoft Live Lab .

Read Details And Blogs About Seadragon Ajax At : http://livelabs.com/seadragon-ajax/

But Today We Would Be Learning To Create The Panorma Image Using The Deep Zoom Application And Integrating Them As Silverlight Web Apllication Or As Seadragon Ajax application which could be embedded or uploaded to any web site or blogs. I will to embedd my Panorama Image as Seadragon Ajax Window Into my Blog.


Let Me Give Basic Introduction to Panorama ....... What Is Panorama ?????? Dictionary Meaning Is -- " Unbroken View Of A Surrounding Region ". In Simple Words We Can Say " A Nice 360 Degree View Of A Place or Scene ". Here We Would Be Describing This Panoramic View Using Image Into The DeepZoom.


Lets Start With The Creation Of The Panorama Image ..................


***** Make Sure You have Following Things Well In Advance *****

-> Latest Version Of Deep Zoom - December 2008. It Can Be Downloaded From Following Link ( Just A 4.1 Mb Download - Relatively Less Than The Previous Versions Downloads ) : DeepZoom Composer Download

-> Latest Version Of Silverlight Runtime - Silverlight 2.0

-> Images That Would Form Panoramic View When Stitched Togeteher In Series - Say Photographs Photographs Of An Area Clicked Continously With Very Small Change In The Clicking Angle.


1. Start The Deep Zoom Composer.

2. Start A New Project. Save It With Any Name ....... Say Panorama


3. Now You Will Get A Similar Window As Shown Below. Here You Need To Add Images To your Project . Just Select all The Images You Have Ready With You. They
Will Be Added One By One To The Project ........


4. Now When All Images Get Added .... switch To The next Window - Compose Window Which Allows the Composition as We Did While Creating DeepZoom Silverlight Application.


Now Select All The Photos By Pressing "Ctrl + A" . When All The Photos Get Selected, Just Right Click. U will get a menu With following options -- Remove
From Project, Create Panorama,etc.

Select " Create Panorama " and A new Window will appear as shown in figure ....


The Project Will Now Stitch The Photos,Align Them In Order And Then Produce the Panoramic Image To You .. as shown in figure ....


5.You will be asked to save the Panoramic Image -- Select Save Panoramic image. After saving the Image will Be Automatically Added To the Project ...


6. Drag The New Panoramic Image Into The Composition Window/Canvas. Note: Only New Panoramic Image Should Be Dragged Onto The Composition Space .... The Same Place where we dragged our images while creating DeepZoom Applications ....


7. Now After Dragging The Image .... Adjust The Image To Fit The Screen As U Like ...

8. Now Click On Export Tab To Export Your Project ..........


Select Export As - Silverlight Project to create a Silverlight Project With DeepZoom. An HTML Page With Your Deep Zoom Application Will Be Created And You
Can The Deep Zoom Output Soon into the Browser.


Select Export As Seadragon Ajax to create a new Seadragon Ajax Project which could be Embedded Into The Web Sites And Blogs .......
You Can Embedd The Seadragon Ajax Project Onto Your Blog Or Site. Refer the Link For More Details : http://livelabs.com/seadragon-ajax/embed-viewer/


*********************************************************************************

This is a nice option to create Panorama Of Images And Just Add them To The Deep Zoom Silverlight Project To View Beautiful Panoramic View Of A place ...........

But You Can Also Use The New Technoogy -- Photosynth (http://www.photosynth.net/) too to create a Synth of Your Images Using The Application ....... Read My Previous Blog Articles For Reference On How To Create The Your Own Synth Using Photosynth ...

**********************************************************************************

I have also created a Seadagon Ajax Project Of A Panoramic Image Of My Old Hostel Room ......

You Can Watch It At My this Blog Page ...... I have Added These
Photos As Synth to The Photosynth .... just search "Aashish Singh Negi" at the Photosynth's Home Page and You Will Get My Synth - My Hostel Room In the
Results ...... I have Uploaded other Synths too ...... You Can View Them Too ................

Thanks For Visiting The Blog ! Keep Visiting !


Aashish Singh Negi
SIT Lonavla
negaashish2008@hotmail.com

Friday, November 14, 2008

Get Started With Silverlight .........


Hey All My friends (FE,SE,TE,MCA) from SIT Lonavla ........ I know I was going to take a session on 'Developing A Rich Interactive Application (RIA) Using Silverlight.....' but I was unable to take the session due to various reasons such as tight schedule,unavailability etc .

For Your Ease I have Blogged The Info I was going to share about Silverlight during the HOL session. May be u get to know little bit/byte about Silverlight Through This  ..................

  • The First Question Comes To Mind That What Is Thing 'Silverlight' ?
If We See The Internet Definition " Silverlight Is A Cross Browser, Cross Platform Plug-In for delivering next generation of .NET  based Media Experiences and Rich Interactive Application (RIA) For Web."

  • Whats this cross browser,cross platform,RIA,etc. ? Not understable ....
In a simple human understable language " Silverlight is a tool through which Designersand Developers colabrate with each other more effectively using their excellent skills to develop or produce next generation web experience."


  • How Many Versions Of Silverlight Is Available ??????
Silverlight Was Previously Known As WPF/E ( E stands for Everywhere ) .
Silverlight 1.0 was release at first which had a XAML support.
The next And Current Version Is Silverlight 2.0 which C# as Programming Language.

  • Links To Know More About Silverlight .......
  1. http://silverlight.net - Official Site For Silverlight
  2. http://pendsevikram.blogspot.com - Blogspot Of Vikram Pendse, PUG Member  ... He Frquently Blogs About Silverlight.
  3. http://learnvisualstudio.net
  4. http://groups.msn.com/puneusergroup
  • Practical Demos/ Practical RIA Applications Online 
  1. http://silverlight.idvsolutions.com - Virtual Earth Using Silverlight
  2. http://photosynth.net - Photosynth Based On Seadragon Technology
  3. http://silverlight.metaliq.com/topbanana - Top Banana ( Very Nice )
  4. http://silverlight.net - Silverlight Official Showcase 

Thats All For Today Guys ...............................

Keep Visiting To get More Info About Silverlight ................................

Friday, August 15, 2008

Sinhgad Institute Of Technology , Lonavla

My College Sinhgad Institute Of technology lies in beautiful valley of Lonavla.
U may see the Sinhgad Lonavla Campus while Travelling from Mumbai To Pune
either via Railway or via Mumbai Pune Expressway.

The campus is contructed in magnificent vicinity of Lonavla. The campus holds
about 3000 students. The Campus has all facilities like Medical, Gym, Swimming Pool,
Bank & ATM, Stationary Shop,Hotel etc.

My College is Sinhgad Institute Of Technology, Lonavla. Its an Engineering College with
various branch intake in Information Technology(IT),Computer Science(CS), Mechanical
And Electrnics & Telecommunication(EnTC). Our college's principal is Dr. SS Inamdar.
He is a great & nice person. He is very much worried about all the students of the college.
He does eveything for his students. He started value addition programme for technological
development of students.

In all it is a very nice campus ............................................